|
|||||||||||||||
uIP Embedded Web Server Demo
|
|||||||||||||||


 |
This page details the FreeRTOS STR91x ARM9 port for the IAR development tools.
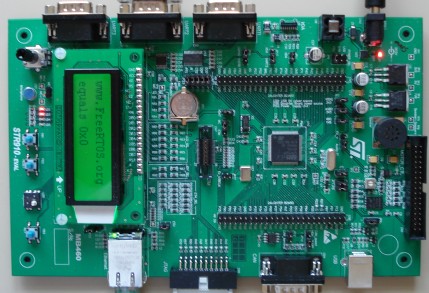
The port is provided with an embedded web server demo targeted at the STR910-EVAL development kit (instructions are provided should you wish to use an alternative development board) which:
- Utilises the latest v1.0 of the open source uIP TCP/IP stack.
- Alternatively, uses the open source lwIP TCP/IP stack 1.
- Includes a basic ENET peripheral driver.
- Demonstrates the integration of uIP with FreeRTOS.
- Demonstrates the creation of dynamic data with a simple CGI scripting language (provided by Adam Dunkels).
- Creates more than 40 demo tasks.
- Has been kept under 32KBytes compiled code size to ensure it compiles with the KickStart version of the IAR development tool suite.
FreeRTOS has made some modifications to the uIP stack since this demo was created. See the Embedded Ethernet Examples List page for more information.
(1 Paul YU performed the initial integration of lwIP into the existing FreeRTOS demo. ST also contributed. Thanks guys!)
Note: If this project fails to build then it is likely the version of IAR Embedded Workbench being used is too old. If this is the case, then it is also likely that the project file has been (silently) corrupted and will need to be restored to its original state before it can be built even with an updated IAR version.
IMPORTANT! Notes on using the STR9 RTOS port Web Server Demo
Please read all the following points before using this RTOS port.See also the FAQ My application does not run, what could be wrong?
Source Code Organisation
The FreeRTOS download contains the source code for all the FreeRTOS ports, so contains many more files than used by this demo. See the Source Code Organization section for a description of the downloaded files and information on creating a new project.The STR9 Web Server demo project workspace rtosdemo.eww can be found in the Demo/ARM9_STR91X_IAR directory and should be opened from within the Embedded Workbench IDE.
The uIP stack is located in Demo/Common/ethernet/uIP/uip-1.0.
The lwIP stack is located in Demo/Common/ethernet/lwIP.
The Demo Application
Demo application setup
- Ethernet - for both the uIP and lwIP demos
Connect the STR910-EVAL development board to a computer running a web browser either directly using a point to point (crossover) cable, or via a hub/router using a standard Ethernet cable.
See the notes below regarding the library file usage for details of Ethernet protocol auto negotiation.
The jumper marked JP25 must be positioned in the MAC position (across the two pins closest to the marking MAC on the silk screen).
- Ethernet - when using the uIP demo
The IP address used by the demo is set by the constants uipIP_ADDR0 to uipIP_ADDR3 within the file Demo/ARM9_STR91X_IAR/webserver/uIP_Task.c. The IP addresses used by the web browser computer and the prototyping board must be compatible. This can be ensured by making the first three octets of both IP addresses identical. For example, if the web browser computer uses IP address 192.168.100.1, then the prototyping board can be given any address in the range 192.168.100.2 to 192.168.100.254 (barring any addresses already present on the network).
The MAC address used by the demo is set by the constants uipMAC_ADDR0 to uipMAC_ADDR5 within the same file. You must ensure that the configured MAC address is unique on the network to which the development board is being connected.
- Ethernet - when using the lwIP demo
The IP address used by the demo is set by the constants emacIPADDR0 to emacIPADDR3 within the file Demo/ARM9_STR91X_IAR/lwIP/include/lwIPWebServer/BasicWEB.h. The IP addresses used by the web browser computer and the prototyping board must be compatible. This can be ensured by making the first three octets of both IP addresses identical. For example, if the web browser computer uses IP address 192.168.100.1, then the prototyping board can be given any address in the range 192.168.100.2 to 192.168.100.254 (barring any addresses already present on the network).
The MAC address used by the demo is set by the constants MAC_ADDR0 to MAC_ADDR5 within the file Demo/ARM9_STR91X_IAR/library/include/91x_enet.h. You must ensure that the configured MAC address is unique on the network to which the development board is being connected.
- LEDs
The demo application uses the LEDs built into the prototyping board so no specific hardware setup is required.
- UART
The demo application includes an interrupt driven UART test where one task transmits characters that are then received by another task. For correct operation of this functionality a loopback connector must be fitted to the UART2 connector of the STR910-EVAL prototyping board (pins 2 and 3 must be connected together on the 9Way connector). The jumper marked JP13 must be in the UART2 position (across the two pins closest to the marking UART2 on the silk screen).
Demo project organisation
The RTOSDemo workspace (Demo/ARM9_STR91X_IAR/RTOSDemo.eww) contains a single project, for which the following configurations are provided:
- THUMB:
THUMB mode uIP demo. This can be used with the IAR Embedded Workbench KickStart edition. - ARM - uIP - D:
ARM mode uIP demo, debug configuration. - ARM - uIP - R:
ARM mode uIP demo, release configuration. This can be used with the IAR Embedded Workbench KickStart edition. - ARM - lwIP - D:
ARM mode lwIP demo, debug configuration. - ARM - lwIP - R:
ARM mode lwIP demo, release configuration.
Building the demo application for debug
Simply open the rtosdemo.eww workspace file from within the IAR Embedded Workbench IDE, ensure THUMB is the selected configuration if you are using the 32K limited compiler, then select 'Build Target' from the IDE 'Project' menu.
Running the demo application
- Ensure the J-Link JTAG debug interface is connected and that the development board is power up.
- Ensure an Ethernet cable is connected as described above.
- Select 'Debug' from the IDE 'Project' menu.
- The STR9 flash memory will automatically be programmed with the demo application, and the debugger will break at the reset vector address. Select 'Go' from the IDE 'Debug' menu to start the application executing.
Functionality
The demo application creates more than 40 tasks - consisting predominantly of the standard demo application tasks (see the demo application section for details of the individual tasks). In addition to the standard demo tasks the following tasks are created to demonstrate features of the development board and RTOS.- Web Server task:
Serves pages of dynamically generated data showing RTOS task and TCP/IP states and statistics. - LCD task:
The LCD task is the only task that accesses the LCD directly, so mutual exclusion is ensured. Any task wishing to display text sends the LCD task a message containing a pointer to the string that should be displayed. The LCD task itself just blocks on a queue waiting for such a message to arrive - processing each in turn. - LCD Message task:
The LCD Message task does nothing other than periodically send messages to the LCD task. The messages originating from the LCD Message task are displayed on the top row of the LCD. - Check task:
The Check task only executes every three seconds but has the highest priority so is guaranteed to get processor time. Its main function is to check that all the other tasks are still operational. Most tasks maintain a unique count that is incremented each time the task successfully completes a cycle of its function. Should any error occur within such a task the count is permanently halted. The check task sets a bit in an error status flag should it find any counter variable at a value that indicates an error has occurred. The error flag value is converted to a string and sent to the LCD task for display on the bottom row on the LCD.
When executing correctly the demo application will behave as follows:
- The development board will serve web pages to a standard web browser. To connect to the target:
- Open a web browser on the connected computer.
- Type "HTTP://" followed by the target IP address into the browsers address bar.
Entering the IP address into the web browser
(obviously use the correct IP address for your system)
- LEDs LD2, LD3 and LD4 are under control of the 'flash' tasks. Each will flash at a constant frequency, with LED LD2 being the fastest and LED LD4 being the slowest.
- LD5 will toggle each time a character is transmitted on the UART. The toggling is too rapid to see each individual character.
- The top row of the LCD will display a rotating message originating from the LCD Message task (as described above): IAR - STR912 - DEMO - www.FreeRTOS.org.
- The bottom row will display a rotating message originating from the Check task (as described above). If no errors have been found in any task then the check status flag will be 0: Check status flag - equals 0x00.
Configuration and Usage Details
Library Files
The demo relies heavily on the STMicroelectronics peripheral library files, with the following notes and modifications:- Ethernet driver
The Ethernet driver has been extended to make full use of the DMA for received packets. As downloaded 8 buffers are allocated for use by the Rx DMA and no software intervention is required to receive packets. An Rx interrupt has been introduced for the sole purpose of waking the uIP task when data has arrived that requires feeding to the TCP/IP stack.
Only a single buffer is used for the Tx DMA, which is adequate for the uIP TCP/IP stack which itself uses a single buffer.
In addition the driver has been extended to take advantage of the protocol auto negotiation features of the PHY. I have tested this on a 100BaseT full duplex and a 10BaseT half duplex connection only.
- LCD driver
The LCD driver has had some small optimisations. However, writhing a whole string to the LCD can still take approximately 100ms. As the LCD task operates at a higher priority than some of the standard demo tasks I have introduced some delays within the driver. This forces the LCD task to temporarily block during certain operations, and in so doing allow the lower priority demo tasks to execute.
HTML Pages
The HTML pages are converted to constant C structures that are built into the flash image. The Perl script Demo/ARM9_STR91X_IAR/webserver/makdefsdata can be used for this purpose.
CGI Scripts
Each of the served uIP web pages includes some dynamic data to demonstrate the use of the uIP CGI scripting facility. See the uIP documentation for further information.The RTOS CGI file generates a table containing information on each task executing within the demo. This table is interesting for demonstration purposes, but as it is necessary to leave the RTOS scheduler suspended for an extended period during its creation it is not recommended for use in applications with strict real time requirements.
ENET Driver Re-entrancy
The uIP task is the only task that accesses the uIP and DMA buffers, and therefore explicit re-entrancy is not required for this demo.
Performance
The uIP stack only permits one packet to be unacknowledged at any one time. It waits for each packet to be acknowledged individually. Performance is therefore greatly improved by transmitting dynamically generated data as one large packet, rather than multiple small packets. This is demonstrated by the sample CGI scripts included in the source code download. The CGI script used to generate the table of tasks transmits the entire table in one packet and therefore loads quickly. The CGI scripts used to generate the table of TCP/IP connections and the table of TCP/IP statistics both transmit each line within the respective tables individually, and therefore the pages take longer to load. The lwIP TCP/IP stack does not have this limitation.
Execution context
NOTE! : The processor MUST be in supervisor mode when the RTOS scheduler is started (vTaskStartScheduler is called). The demo applications included in the FreeRTOS download switch to supervisor mode prior to main being called. If you are not using one of these demo application projects then ensure Supervisor mode is entered before calling vTaskStartScheduler().
To use ARM mode the preeprocessor constant _RUN_TASK_IN_ARM_MODE_ must be defined as part of the project settings. Naturally the compiler must also be set to generate ARM code.
RTOS port specific configuration
Configuration items specific to this port are contained in Source/Demo/ARM9_STR91X_IAR/FreeRTOSConfig.h. The constants defined in this file can be edited to suit your application. In particular - the definition configTICK_RATE_HZ is used to set the frequency of the RTOS tick. The supplied value of 1000Hz is useful for testing the RTOS kernel functionality but is faster than most applications require. Lowering this value will improve efficiency.Each port #defines 'BaseType_t' to equal the most efficient data type for that processor. This port defines BaseType_t to be of type long.
Note that vPortEndScheduler() has not been implemented.
Interrupt service routines
The task context is automatically saved on entry to an ISR, and restored on exit from an ISR. Interrupt service routines should therefore be defined just like any other function with no special syntax or assembly file wrappers required.The macro portEND_SWITCHING_ISR() is provided to enable an ISR to perform a task switch if appropriate (for example, if a character being received on a UART has woken a higher priority task that was waiting for the character).
See the functions UART1_IRQHandler() and ENET_IRQHandler() in the files serial.c and uIP_Task.c respectively for examples.
Switching between the pre-emptive and co-operative RTOS kernels
Set the definition configUSE_PREEMPTION within Demo/ARM9_STR91X_IAR/FreeRTOSConfig.h to 1 to use pre-emption or 0 to use co-operative.Compiler options
As with all the ports, it is essential that the correct compiler options are used. The best way to ensure this is to base your application on the provided demo application makefile.Memory allocation
Source/Portable/MemMang/heap_2.c is included in the STR9 demo application project to provide the memory allocation required by the RTOS kernel. Please refer to the Memory Management section of the API documentation for full information.Serial port driver
It should also be noted that the serial drivers are written to test some of the real time kernel features - and they are not intended to represent an optimised solution.
NXP tweet showing LPC5500 (ARMv8-M Cortex-M33) running FreeRTOS.
Meet Richard Barry and learn about running FreeRTOS on RISC-V at FOSDEM 2019
Version 10.1.1 of the FreeRTOS kernel is available for immediate download. MIT licensed.
View a recording of the "OTA Update Security and Reliability" webinar, presented by TI and AWS.
FreeRTOS and other embedded software careers at AWS.

![]()


![]()