|
|
|
ARM Cortex-R5 Xilinx UltraScale MPSoC
[RTOS Ports]
The Xilinx SDK
(Software Development Kit) includes wizards that create FreeRTOS projects for
all the cores found on the
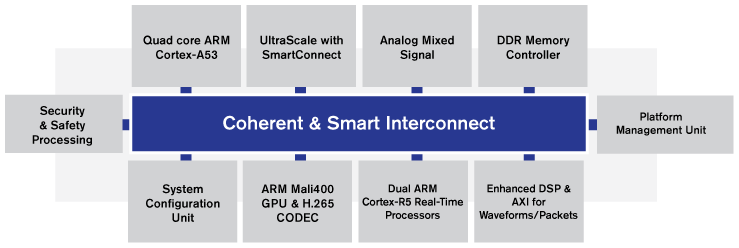
Zynq UltraScale MPSoC, which includes ARM Cortex-A53 (64-bit), ARM Cortex-R5, and Microblaze processors.
Introduction
This page documents a FreeRTOS demo application that targets an ARM Cortex-R5
core on a Xilinx Zynq UltraScale+ MPSoC. A similar project that targets a
64-bit ARM Cortex-A53 core on the same device is provided separately.
The demo uses a standalone BSP (which is
the Board Support Package generated by the SDK), and builds FreeRTOS as part of
the application. The hardware design project targets the Xilinx ZCU102
Evaluation board.
FreeRTOS is also distributed as part of the Xilinx SDK package, and the SDK
includes wizards to generate FreeRTOS for the UltraScale+ MPSoC's 64-bit ARM Cortex-A53, ARM Cortex-R5
and Microblaze cores. If a FreeRTOS project is created using the SDK wizard
then FreeRTOS is built as part of the BSP instead of as part of the application.
Instructions on creating a FreeRTOS BSP are
also provided on this page.
The ARM Cortex-R5 FreeRTOS port implements a full interrupt nesting model,
and supports the vectored floating point unit (VFP/FPU).
IMPORTANT! Notes on using the FreeRTOS ARM Cortex-R5 port
Please read all the following points before using this RTOS port.
- Source Code Organisation
- The Demo Application Functionality
- Build Instructions
- RTOS Configuration and Usage Details
Also see the FAQ My application does not run, what could be wrong?, and
the page that provides instruction on using FreeRTOS on ARM Cortex-A embedded processors
as the information on running the RTOS on an ARM Cortex-A core is also applicable
to running the RTOS on an ARM Cortex-R core.
Source Code Organization
The FreeRTOS download contains the source code for all the RTOS ports, and
all the RTOS demo applications. That means the download contains many more
source files than are required to use the Zynq UltraScale+ Cortex-R5 MPSoC port
and demo application.
See the Source Code Organization
section of this web site for a description of the downloaded files.
The directory structure used by the ARM Cortex-R5 demo application is shown and
described below. The root CORTEX_R5_UltraScale_MPSoC directory is
located in FreeRTOS/Demo.
CORTEX_R5_UltraScale_MPSoC
  |
  +-RTOSDemo_R5               Contains the SDK project and C files specific to the demo.
  |
  +-RTOSDemo_R5_bsp           Contains the hardware board support package.
  |
  +-ZynqMP_ZCU102_hw_platform The ZCU102 hardware description.
Notes relating to the directory structure:
-
The projects contained in the ZynqMP_ZCU102_hw_platform and RTOSDemo_R5_bsp directories
were created by the Xilinx SDK.
-
The RTOSDemo_R5 directory only contains the source files that are specific
to the Zynq UltraScale+ MPSoC demo. The FreeRTOS source files, and the source files that
implement tasks that are common to all demo applications, are located
elsewhere in the directory tree.
The project will only build if the default directory structure
is unchanged. Also see the page that describes
how to use virtual and linked paths in
the Eclipse project explorer.
The Zynq UltraScale+ MPSoC ARM Cortex-R5 Demo Application
Functionality
The constant mainSELECTED_APPLICATION, which is #defined at the top
of main.c, is used to switch between a basic and simply Blinky style demo, and a
more comprehensive test and demo application.
Functionality with mainSELECTED_APPLICATION set to 0
If mainSELECTED_APPLICATION is set to 0 then main() will call
main_blinky(), which is implemented in the main_blinky.c C source file.
main_blinky() implements a very simple example that uses two tasks and one queue.
One task uses the queue to repeatedly send the value 100 to the other task.
The receiving task simply prints a message to the USB UART port (J83) each time it
receives the message. 115200 baud is used.
The value 100 is sent to the queue every 200 milliseconds, so the message is printed
to the UART every 200 milliseconds.
Functionality with mainSELECTED_APPLICATION set to 1
If mainSELECTED_APPLICATION is set to 1 then main() will call main_full(),
which is implemented in the main_full.c C source file.
main_full() creates a comprehensive application that tests the RTOS port and
demonstrates:
The majority of the tasks created by the comprehensive demo are from the set of
standard demo tasks, which are common to all the RTOS
demo applications. They have no specific functionality or purpose other than to
demonstrate the FreeRTOS API being used, and test the RTOS architecture and compiler
port.
The following tasks are also created:
-
Interrupt nesting test tasks
Timers are used to test interrupt nesting, and test RTOS queues being used
from nested interrupts. The demo generates the RTOS tick interrupt from
TTC timer 0, so the interrupt nesting test uses TTC timers 2, 3 and 4.
-
Register test tasks
The register test tasks test the RTOS context switch mechanism. They
start by filling all the ARM Cortex-R5 ALU and FPU register with known
and unique values, then repeatedly check that the values
originally written to the registers remain unchanged for
the lifetime of the task. The nature of
the register check tasks necessitates that they are written in assembly
code.
-
A 'check' task
The check task periodically queries the standard demo tasks, and the
register check tasks, to ensure they are still executing and functioning
as intended, and then prints a status message to the USB UART (J83).
115200 baud is used.
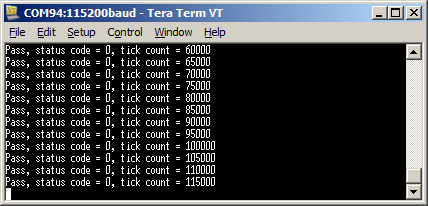
The output generated by the full demo
Hardware setup
The demo is configured to download and run the generated executable over the
JTAG interface. To enable JTAG booting all four switches on bank SW6 need to be
set toward the centre of the board.
Build Instructions - Using a Standalone BSP
This section describes how to build the demo described immediately above, which is
found in the official FreeRTOS download. The section that follows after describes
how to create a project using the Xilinx SDK, in which case the FreeRTOS source
files are built as part of the BSP.
Importing the RTOS demo project into the SDK Eclipse workspace
To import the Xilinx Software Development Kit (SDK) projects into an existing or new Eclipse Workspace:
-
Select "Import" from the SDK "File" menu. The dialogue box shown below
will appear. Select General->Existing Project into Workspace, as shown in the image.
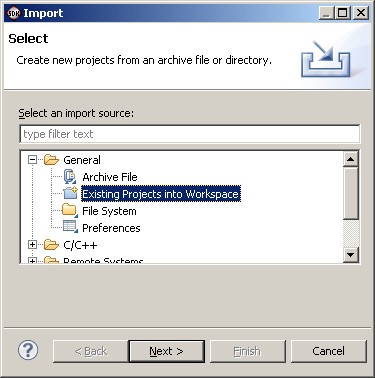 The dialogue box that appears when "Import" is first clicked
-
In the next dialogue box, select FreeRTOS/Demo/CORTEX_R5_UltraScale_MPSoC
as the root directory. Then, make sure the RTOSDemo_R5, RTOSDemo_R5_bsp and
ZynqMP_ZCU102_hw_platform projects are checked in the "Projects" area,
and that the Copy Projects Into
Workspace box is not checked, before clicking
the Finish button (see the image below for the correct check box states).
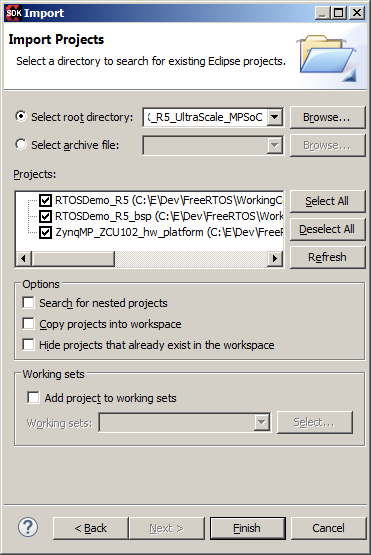 Make sure all three projects are checked, and "Copy projects into workspace" is not checked
-
Once all three projects have been imported, the project explorer window of the SDK IDE
will appear as shown below.
The ZynqMP_ZCU102_hw_platform and RTOSDemo_R5_bsp projects are dependencies of the
RTOSDemo_R5 project, so only the RTOSDemo_R5 project needs to be built explicitly.
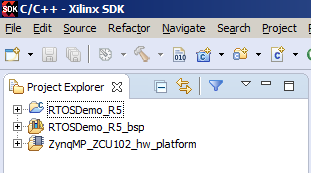 All three projects imported into the workspace
Building the RTOS demo application
-
Open the project's main.c file, and set mainSELECTED_APPLICATION
to generate the simple blinky demo, or the full test and demo
application, as required.
-
Select 'Rebuild All' from the Eclipse IDE 'Project' menu.
Starting a debug session
-
Ensure the ZCU102 target hardware is powered up and
connected to the host computer using an appropriate debug interface.
-
Ensure all four switches on bank SW6 are set such that they are toward
the centre of the board. This enables JTAG booting.
-
Select 'Debug Configurations...' from the IDE's 'Run' menu. The
Debug Configurations dialogue box will appear. Double click
'Xilinx C/C++ application (System Debugger)' to create a new debug
configuration.
-
Configure the 'Target Setup' tab as shown in the image below.
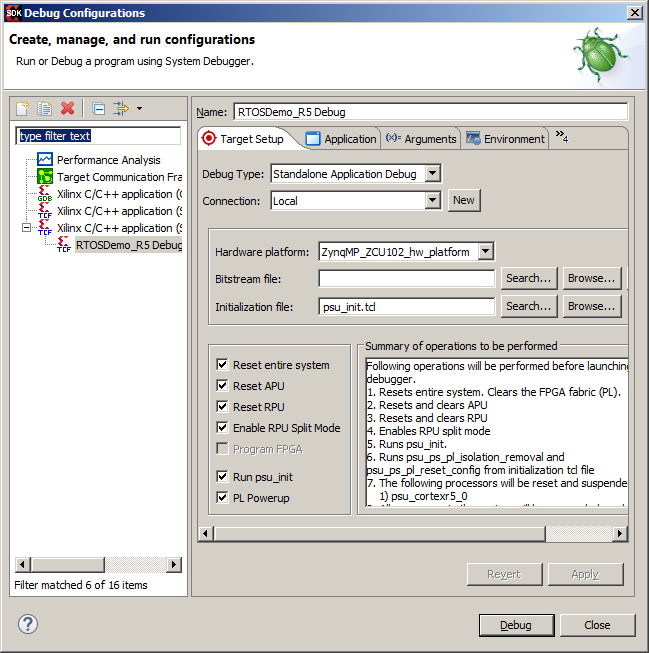 The required settings on the Target Setup tab
-
Configure the 'Application' tab as shown in the image below.
 The required settings on the Application tab
All the other tabs in the 'Debug Configurations' dialogue can be left
with their default settings.
-
Click the "Debug" button to commence debugging. The application will be
downloaded to RAM and the debugger will break on entry to main(). It
may be necessary to select the correct ARM Cortex-R5 core in the Debug
window in order to see the correct source code, and use the debugging
controls.
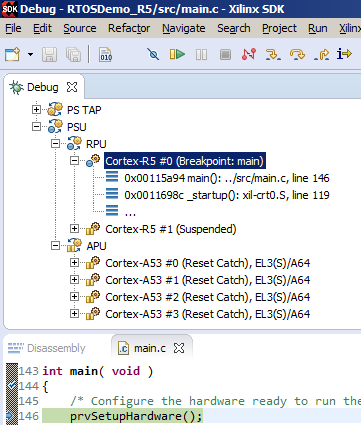 Selecting the ARM Cortex-R5 0 core in the Debug window
Build Instructions - Creating a FreeRTOS BSP
The previous section described how to build
the RTOS project that comes in the main FreeRTOS zip file download.
FreeRTOS also ships with the Xilinx SDK. This section describes how to create a
FreeRTOS project for an ARM Cortex-R5 core using the SDK.
Creating a new FreeRTOS project
-
Select "New->Application Project" from the SDK "File" menu. The New
Project dialogue box will appear.
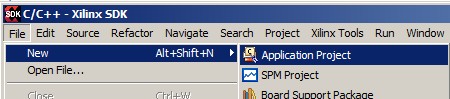 Selecting the New Application Project menu item
-
In the New Project dialogue box, first select "psu_cortexr5_0" as the
processor, then select the hardware platform as appropriate, and finally
select freertos as the OS platform before clicking "Next". The New Project
Templates dialogue will appear.
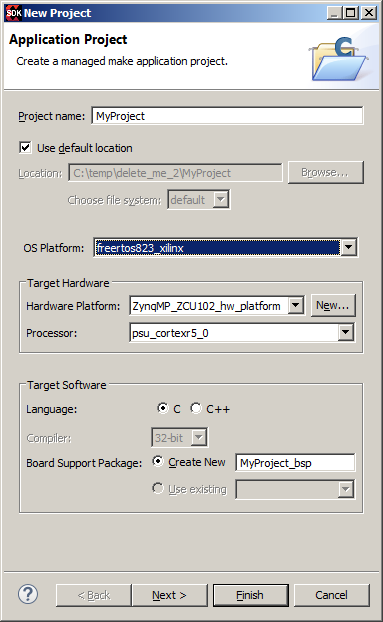 The required New Project dialogue settings
-
Select the FreeRTOS Hello World template, then click "Finish". The SDK
will create a hardware description project, a BSP project, and an application
project. The FreeRTOS source code is built as part of the BSP.
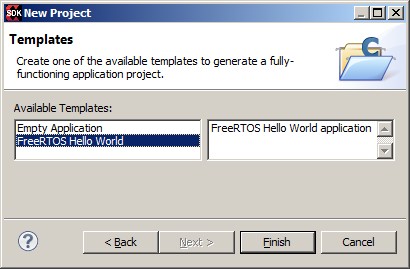 Selecting the FreeRTOS template
Configuring a FreeRTOS BSP
The official FreeRTOS demo uses a standalone BSP, and builds FreeRTOS as part of
the application. When this is done FreeRTOS is configured by manually editing the
FreeRTOSConfig.h header file.
Projects created by the
SDK (as just described) build FreeRTOS as part of the BSP. When this is done
the FreeRTOSConfig.h header file is not edited manually, and instead FreeRTOS
is configured using a dialogue box within the SDK environment.
-
Follow the instructions above to have a FreeRTOS Hello World
application created by the SDK.
-
Select "Board Support Package Settings" from the SDK "Xilinx Tools" menu.
The Board Support Package Settings dialogue will appear.
-
Select freertos in the left pane of the Board Support Package Settings dialogue,
then use the table in the right pane of the same dialogue to configure
FreeRTOS as required.
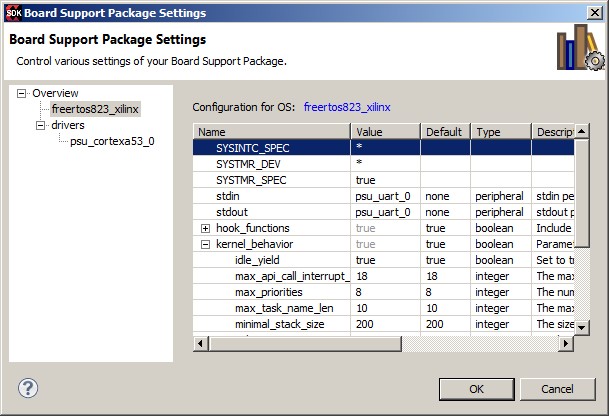 Using the Board Support Package Settings dialogue to configure FreeRTOS
FreeRTOS ARM Cortex-R port specific configuration
Attention please!:
A separate page provides information on running the RTOS on an ARM Cortex-A
core. The information on that page is also relevant to running the RTOS on an
ARM Cortex-R core.
Pay particular attention to the value and meaning of the
configMAX_API_CALL_INTERRUPT_PRIORITY setting.
Configuration items specific to this demo are contained in /FreeRTOS/Demo/CORTEX_R5_UltraScale_MPSoC/RTOSDemo_R5/src/FreeRTOSConfig.h.
The constants defined in this file can be edited to suit your application.
Interrupt vector table
By default, SDK projects define the interrupt vector table as part of the BSP. This
makes it difficult to install the FreeRTOS handlers using the methods described
on the page about
running FreeRTOS on ARM Cortex-A (and ARM Cortex-R) embedded processors. Therefore, this demo
defines its own interrupt vector table in FreeRTOS_asm_vectors.S, and the
linker script contains an edit to ensure the FreeRTOS vector table is used instead
of the vector table defined by the BSP.
[Application Defined] Interrupt service routines
This demo uses drivers provided by Xilinx to configure the interrupt controller,
and install application defined interrupts. Examples can be found in
FreeRTOS/Demo/CORTEX_R5_UltraScale_MPSoC/RTOSDemo_R5/src/Full_Demo/IntQueueTimer.c,
which implements and installs the interrupt service routines used by the interrupt
nesting test.
The Xilinx drivers require interrupt
service routines (ISRs) to accept a void * parameter, although the parameter
is not always used. The required ISR prototype is therefore:
void Interrupt_Handler( void *pvUnusedParameter );
If an ISR causes a task of equal or higher priority than the currently executing
task to leave the Blocked state then the ISR must request a context switch before
the ISR exits. When this is done the interrupt will interrupt one RTOS task,
but return to a different RTOS task.
The macros portYIELD_FROM_ISR() (or portEND_SWITCHING_ISR()) can be used to
request a context switch from within an ISR.
The following source code snippet is provided as an example. The example ISR
uses a direct to task notification to synchronise with a task (not shown), and calls portYIELD_FROM_ISR()
to ensure the interrupt returns directly to the task.
void Dummy_IRQHandler( void *pvUnusedInThisExample )
{
long lHigherPriorityTaskWoken = pdFALSE;

    /* The parameter is not used in this case. */
    ( void ) pvUnusedInThisExample;

    /* Clear the interrupt if necessary. */
    Dummy_ClearITPendingBit();

    /* This interrupt does nothing more than demonstrate how to synchronise a
    task with an interrupt.  A direct to task notification is used for this
    purpose.  Note lHigherPriorityTaskWoken is initialised to pdFALSE. */
    vTaskNotifyGiveFromISR( xTaskToNotify, &lHigherPriorityTaskWoken );

    /* If the task referenced by xTaskToNotify was blocked waiting for the
    notification, and sending the notification caused the task to unblock, and
    the unblocked task has a priority higher than or equal to the currently
    Running task (the task that this interrupt interrupted), then
    lHigherPriorityTaskWoken will have been set to pdTRUE internally within
    vTaskNotifyGiveFromISR().  Passing pdTRUE into the portYIELD_FROM_ISR() macro
    will result in a context switch being pended to ensure this interrupt returns
    directly to the unblocked, higher priority, task.  Passing pdFALSE into
    portYIELD_FROM_ISR() has no effect. */
    portYIELD_FROM_ISR( lHigherPriorityTaskWoken );
}
Only FreeRTOS API functions that end in "FromISR" can be called from an
interrupt service routine - and then only if the priority of the interrupt
is less than or equal to that set by the configMAX_API_CALL_INTERRUPT_PRIORITY
configuration constant (meaning a numerically higher value).
Resources used by FreeRTOS
Information is provided on the Using FreeRTOS on ARM Cortex-A Embedded Processors page.
This demo is configured to generate the tick interrupt from TTC channel 0.
Memory allocation
The FreeRTOSConfig.h header file used by the demo has both
configSUPPORT_STATIC_ALLOCATION and configSUPPORT_DYNAMIC_ALLOCATION
defined, and the demo shows both methods being used.
Source/Portable/MemMang/heap_4.c is included in the ARM Cortex-R5 demo application project to provide the memory
allocation required when objects are created using dynamic memory allocation.
Please refer to the Memory Management section of the API documentation for
full information.
Miscellaneous
Note that vPortEndScheduler() has not been implemented.
Copyright (C) Amazon Web Services, Inc. or its affiliates. All rights reserved.
|