|
|||||||||||||||
FreeRTOS EFM32 Demo
|
|||||||||||||||


|
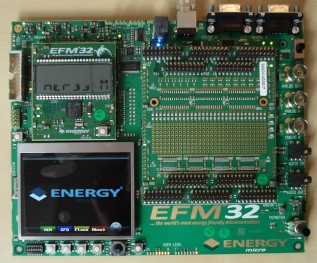 The Silicon Labs Gecko development kit |
NOTE: This page documents an original, so older, EFM32 demo. Newer demos that include a demonstration of low power tickless operation are now available.
This page presents the first FreeRTOS demo for the ARM Cortex-M3 based Silicon Labs EFM32 microcontroller.
The EFM32 provides four energy saving modes called EM1 to EM4 with EM4 providing the greatest energy saving. However, the demo presented on this page uses the standard FreeRTOS ARM Cortex-M3 port so the RTOS kernel itself does not take advantage of these energy saving modes. Instead, some basic energy saving functionality has been added to the demo code (rather than the RTOS kernel code), but this means that only EM1 can be demonstrated. Using any other mode would cause the tick interrupt to stop. See the main Silicon Labs listing for links to other demos that use EM2 and EM3.
The development kit is fitted with an EFM32G890F128 microcontroller, which has 128KBytes of Flash and 16KBytes of RAM.
The demo uses:
- The FreeRTOS IAR ARM Cortex-M3 port.
- The IAR Embedded Workbench for ARM.
The FreeRTOS ARM Cortex-M3 port includes a full interrupt nesting model. Interrupt priorities must be set in accordance with the instructions on the Customisation page for correct operation.
IMPORTANT! Notes on using the EFM32 ARM Cortex-M3 Demo
Please read all the following points before using this RTOS port.See also the FAQ My application does not run, what could be wrong?
Source Code Organisation
The IAR Embedded Workbench workspace for the EFM32G890F128 demo is called RTOSDemo.eww and can be found in the FreeRTOS/Demo/CORTEX_EFMG890F128_IAR directory. Note that the project contains both a Debug and a Release configuration, but only the Debug configuration has been configured.The FreeRTOS zip file download contains the files for all the ports and demo application projects. It therefore contains many more files than used by this demo. See the Source Code Organization section for a description of the downloaded files and information on creating a new project.
The Demo Application
Building and executing the demo application
- Open FreeRTOS/Demo/CORTEX_EFMG890F128_IAR/RTOSDemo.eww from within the Embedded Workbench IDE.
- Ensure the Debug configuration is selected.
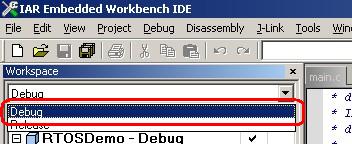
Selecting the debug configuration - Connect the development kit to the host computer. This can be done by either:
- Connecting the host computer to the development kit directly using a standard USB cable, or
- Using a J-Link USB JTAG interface. When this option is selected an external 5V power supply is also required, and the direction of the JTAG connector on the development kit must be set to 'IN' (this latter setting is achieved using the 'CFG->Debug Control' menu option on the development kit, using the buttons and joystick on the development hardware itself, not in the IAR IDE).
- Select "Download and Debug" from the "Project" menu - the demo application should build with no errors or warnings before being programmed into the EFM32 Flash memory. The debugger will break at the start of main().
Demo tasks
main() creates 19 tasks before starting the RTOS scheduler. These consist mainly of the standard demo tasks (see the demo application section for details of the individual tasks). They exist to demonstrate how the FreeRTOS API can be used and test the FreeRTOS port only, and contain no application specific useful functionality.The following tasks and tests are created in addition to the standard demo tasks:
- Check task
The check task is included to provide visual feedback of the system status. It periodically queries all the standard demo tasks before toggling user LED 0. If user LED 0 is toggling every five seconds then the check task has not discovered any errors. If the toggle rate increases to every 200ms then an error has been discovered in at least one task.
The check task also places the microcontroller into energy saving mode EM1 for two out of every five seconds. The effect of this is described later on this page.
- LCD test task
The LCD task writes a continually repeating series of patterns to the LCD display. The pattern will pause for two out of every five seconds due to the check task placing the microcontroller into energy saving mode.
- LED test task
This is a very simple task that just turns on user LEDs 8 to 15 in turn, before turning them off again. The LED pattern will pause for two out of every five seconds due to the check task placing the microcontroller into energy saving mode.
Energy saving features
As mentioned at the top of this page, this demo uses the standard FreeRTOS ARM Cortex-M3 port so all the energy saving functionality is (at this time) performed by the demo application rather than the RTOS kernel. The demo application can only make use of energy saving mode EM1 - any other mode would cause the tick interrupt to stop (see the main Silicon Labs listing for links to other demos that use EM2 and EM3).The demo application uses EM1 in two places:
- In the idle hook
The idle hook is called by the idle task, which will only run if there are no higher priority tasks that are able to do so (all higher priority tasks are in either the Blocked or Suspended state).
Having the idle task place the microcontroller into a low power state is a very easy and almost automatic way of saving power. Note however that this demo includes tasks that both share the idle task priority and never enter the blocked state. Removing this type of task will give more processing time to the idle task, and therefore save even more power (as the microcontroller will be placed into the power saving mode sooner and for longer).
- In the check task
The check task is the highest priority task in the system and will therefore always be the task that is selected to execute whenever it is not in the Blocked or Suspended state. Purely for demonstration reasons the check task in this demo will sit in a loop for two seconds during each iteration of its function: Each time the loop executes the check task places the microcontroller into energy saving mode EM1 - each time the tick interrupt occurs the microcontroller will leave EM1 and the loop will execute again. This has the effect of lowing the power consumption for two out of every five seconds, but also has the side effect of causing all the other tasks to pause execution for the full two seconds. The energy saving achieved can be viewed using the Advanced Energy Monitor graph on the development kits board controller display.
RTOS Configuration and Usage Details
RTOS port specific configuration
Configuration items specific to this demo are contained in FreeRTOS/Demo/CORTEX_EFMG890F128_IAR/FreeRTOSConfig.h. The constants defined in this file can be edited to suit your application. In particular -- configTICK_RATE_HZ
This sets the frequency of the RTOS tick.
- configKERNEL_INTERRUPT_PRIORITY and configMAX_SYSCALL_INTERRUPT_PRIORITY
See the RTOS kernel configuration documentation for full information on these configuration constants. It is vital that this documentation is read and understood!
If an interrupt service routine makes use of a FreeRTOS API function then the priority of the interrupt must be set. Leaving it at its default value will result in the interrupt executing with the highest possible priority.
The lowest priority on a ARM Cortex-M3 core is in fact 255 - however different ARM Cortex-M3 vendors implement a different number of priority bits and supply library functions that expect priorities to be specified in different ways.
Each port #defines 'BaseType_t' to equal the most efficient data type for that processor. This port defines BaseType_t to be of type long.
Note that vPortEndScheduler() has not been implemented.
Interrupt service routines
In the demo application the vector table remains in flash.Unlike most ports, interrupt service routines that cause a context switch have no special requirements and can be written as per the compiler documentation. The macro portEND_SWITCHING_ISR() can be used to request a context switch from within an ISR. An example interrupt service routine template is provided below. This should be used as a reference example.
Note that portEND_SWITCHING_ISR() will leave interrupts enabled. Also note that the priority of any interrupt that makes use of the FreeRTOS API (as does the template below) must be set to be equal to or lower than confgiMAX_SYSCALL_INTERRUPT_PRIORITY. For an interrupt priority to be lower than configMAX_SYSCALL_INTERRUPT_PRIORITY it must be numerically higher than configMAX_SYSCALL_INTERRUPT_PRIORITY because on the ARM Cortex-M3 numerically low priority values represent logically high interrupt priorities.
/* The interrupt service routine can be written as a standard C function. */
void vAnExampleISR( void )
{
long lTaskWokenByPost = pdFALSE;
unsigned long ulDataValue;

    /* Remember to clear the interrupt source. */
    ....

    /* Assume the interrupting peripheral supplies a value that needs to be
    passed to a task. */
    ulDataValue = ulGetValueFromPeripheral();

    /* In this example, a queue is used to send data to a task.  This could
    equally be a counting or other type of semaphore.  Note that lTaskWokenByPost
    has already been initialised to pdFALSE.  The queue must have already been
    created before this interrupt service routine executes for the first time!. */
    xQueueSendFromISR( xQueue, &ulDataValue, &lTaskWokenByPost );

    /* If sending to the queue caused a task to unblock, and the task that was
    unblocked has a priority equal to or above the currently executing task, then
    lTaskWokenByPost will have been set to pdTRUE.  Passing pdTRUE as the
    parameter to portEND_SWITCHING_ISR() will cause a context switch to occur as
    soon as the interrupt completes. */
    portEND_SWITCHING_ISR( lTaskWokenByPost );
}
Switching between the pre-emptive and co-operative RTOS kernels
Set the definition configUSE_PREEMPTION within FreeRTOS/Demo/CORTEX_EFMG890F128_IAR/FreeRTOSConfig.h to 1 to use pre-emption or 0 to use co-operative.Compiler options
As with all the ports, it is essential that the correct compiler options are used. The best way to ensure this is to base your application on the provided demo application files.Memory allocation
Source/Portable/MemMang/heap_2.c is included in the ARM Cortex-M3 demo application project to provide the memory allocation required by the RTOS kernel. Please refer to the Memory Management section of the API documentation for full information.
NXP tweet showing LPC5500 (ARMv8-M Cortex-M33) running FreeRTOS.
Meet Richard Barry and learn about running FreeRTOS on RISC-V at FOSDEM 2019
Version 10.1.1 of the FreeRTOS kernel is available for immediate download. MIT licensed.
View a recording of the "OTA Update Security and Reliability" webinar, presented by TI and AWS.
FreeRTOS and other embedded software careers at AWS.

![]()


![]()